Finally - here's the bauble tutorial I promised you earlier in the week. I know there's load of different ways of doing them out there, but here is my own personal favourite.

 3. When the ball of yarn is the size which you would like your bauble to be, stop winding the yarn onto it and cut the strand you are winding.
 4.Take a piece of wool roving and begin wrapping the yarn ball in the roving. You need enough roving to completely cover the ball of yarn, so that it doesn’t show through the roving. Needle the roving into place if necessary.
 5. Place the roving wrapped ball of yarn into the toe of a pair of old tights. Tie a knot in the tights to hold the ball in place inside the toe, and then place in the washing machine with a normal 30-40 degree wash. Towels and jeans work especially well, as they are heavy and so give the ball a good pummelling which helps it to felt.

Now, as you probably all know already (the words 'grandmother' and 'eggs' may spring to mind), needle felting works by entangling the fibres in the wool so that it compacts together, forming a firm felted object or surface. Some of the coarser types of fleece can compact with needling to produce a 3D object, other fibre (such as merino) is best used for embellishment or decoration.
 1. Place your bauble on a table top or tray, and pinch a small amount of the coloured merino from the roving, using your fingertips. If the fibre is stubborn and hard to break off, move your hands further apart, and this will allow the fibres to spread out between your hands, making them easier to break.
 2. It may also be helpful to draw a rough picture of approximately what you would like your finished design to look like, so that you can use this as a guide whilst decorating your bauble.
3. To needle felt, you simply need to use the needle to stab the merino roving into the bauble.
 4. If you make a mistake, or don’t like the positioning of your roving, simply pull it out and you can start again. Felting is very forgiving!
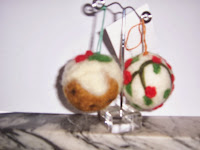
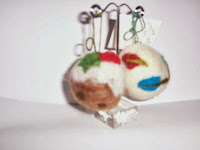
Tada!
I also have kits containing everything you need to make baubles, including a pre-felted bauble blank, needles and merino wool. They're just £4.00 each plus postage. Please contact me if you would like one :)

1. Take a ball of knitting wool. This can be any type, it doesn’t matter if there’s actually any wool content or not. The thicker the wool though, the faster you will be able to make the core for your bauble.
2. Wind the wool around your fingers, until you have a fairly large ‘lump’ then remove from your fingers and wind into a tight ball.
 3. When the ball of yarn is the size which you would like your bauble to be, stop winding the yarn onto it and cut the strand you are winding.
  4.Take a piece of wool roving and begin wrapping the yarn ball in the roving. You need enough roving to completely cover the ball of yarn, so that it doesn’t show through the roving. Needle the roving into place if necessary.
 5. Place the roving wrapped ball of yarn into the toe of a pair of old tights. Tie a knot in the tights to hold the ball in place inside the toe, and then place in the washing machine with a normal 30-40 degree wash. Towels and jeans work especially well, as they are heavy and so give the ball a good pummelling which helps it to felt.
6. Remove from the machine when the wash is ended and cut from the tights. Leave it to dry, and then decorate.
Decorating Your Bauble
Now, as you probably all know already (the words 'grandmother' and 'eggs' may spring to mind), needle felting works by entangling the fibres in the wool so that it compacts together, forming a firm felted object or surface. Some of the coarser types of fleece can compact with needling to produce a 3D object, other fibre (such as merino) is best used for embellishment or decoration.
 1. Place your bauble on a table top or tray, and pinch a small amount of the coloured merino from the roving, using your fingertips. If the fibre is stubborn and hard to break off, move your hands further apart, and this will allow the fibres to spread out between your hands, making them easier to break.
 2. It may also be helpful to draw a rough picture of approximately what you would like your finished design to look like, so that you can use this as a guide whilst decorating your bauble.
The action of the needle will drag the fibres through from the coloured roving you are using, and embed them into the white merino on the felted bauble.
Place the merino on the bauble in the position where you would like to begin your decoration, and holding the felting needle by the coloured end, use the needle to pierce through the merino and into the bauble.
If the merino does not catch and become embedded in the ball on the first try, keep stabbing it until it does.
 4. If you make a mistake, or don’t like the positioning of your roving, simply pull it out and you can start again. Felting is very forgiving!
5. When you have finished embellishing your bauble with your design, Stitch a small loop in the top to hang it up.


Tada!
I also have kits containing everything you need to make baubles, including a pre-felted bauble blank, needles and merino wool. They're just £4.00 each plus postage. Please contact me if you would like one :)
Comments
Post a Comment